


Raspberry Pi 4 Case Fan | 樹莓派 Pi 4 外殼風扇模組(Raspberry Pi 4 原廠外殼專用)
NT$200 未稅
Works with Raspberry Pi 4 and the Raspberry Pi 4 Case. Designed for overclockers and other power users, it keeps your Raspberry Pi 4 at a comfortable operating temperature even under heavy load
- 描述
- 評價 (0)
描述
Raspberry Pi 4 Case Fan | 樹莓派 Pi 4 外殼風扇模組(Raspberry Pi 4 原廠外殼專用)
Works with Raspberry Pi 4 and the Raspberry Pi 4 Case. Designed for overclockers and other power users, it keeps your Raspberry Pi 4 at a comfortable operating temperature even under heavy load
Introducing the Raspberry Pi 4 Case Fan
《特色》
- 原廠散熱片(18×18×10mm)散熱效果佳。
- 原廠散熱套件,可使用 GPIO 控制啟動風扇條件。
- 主動散熱,可將熱氣從 USB 和 Ethernet 空隙中帶走。
- 完美搭配原廠紅白外殼,WiFi 訊號不衰減。
《Getting started》
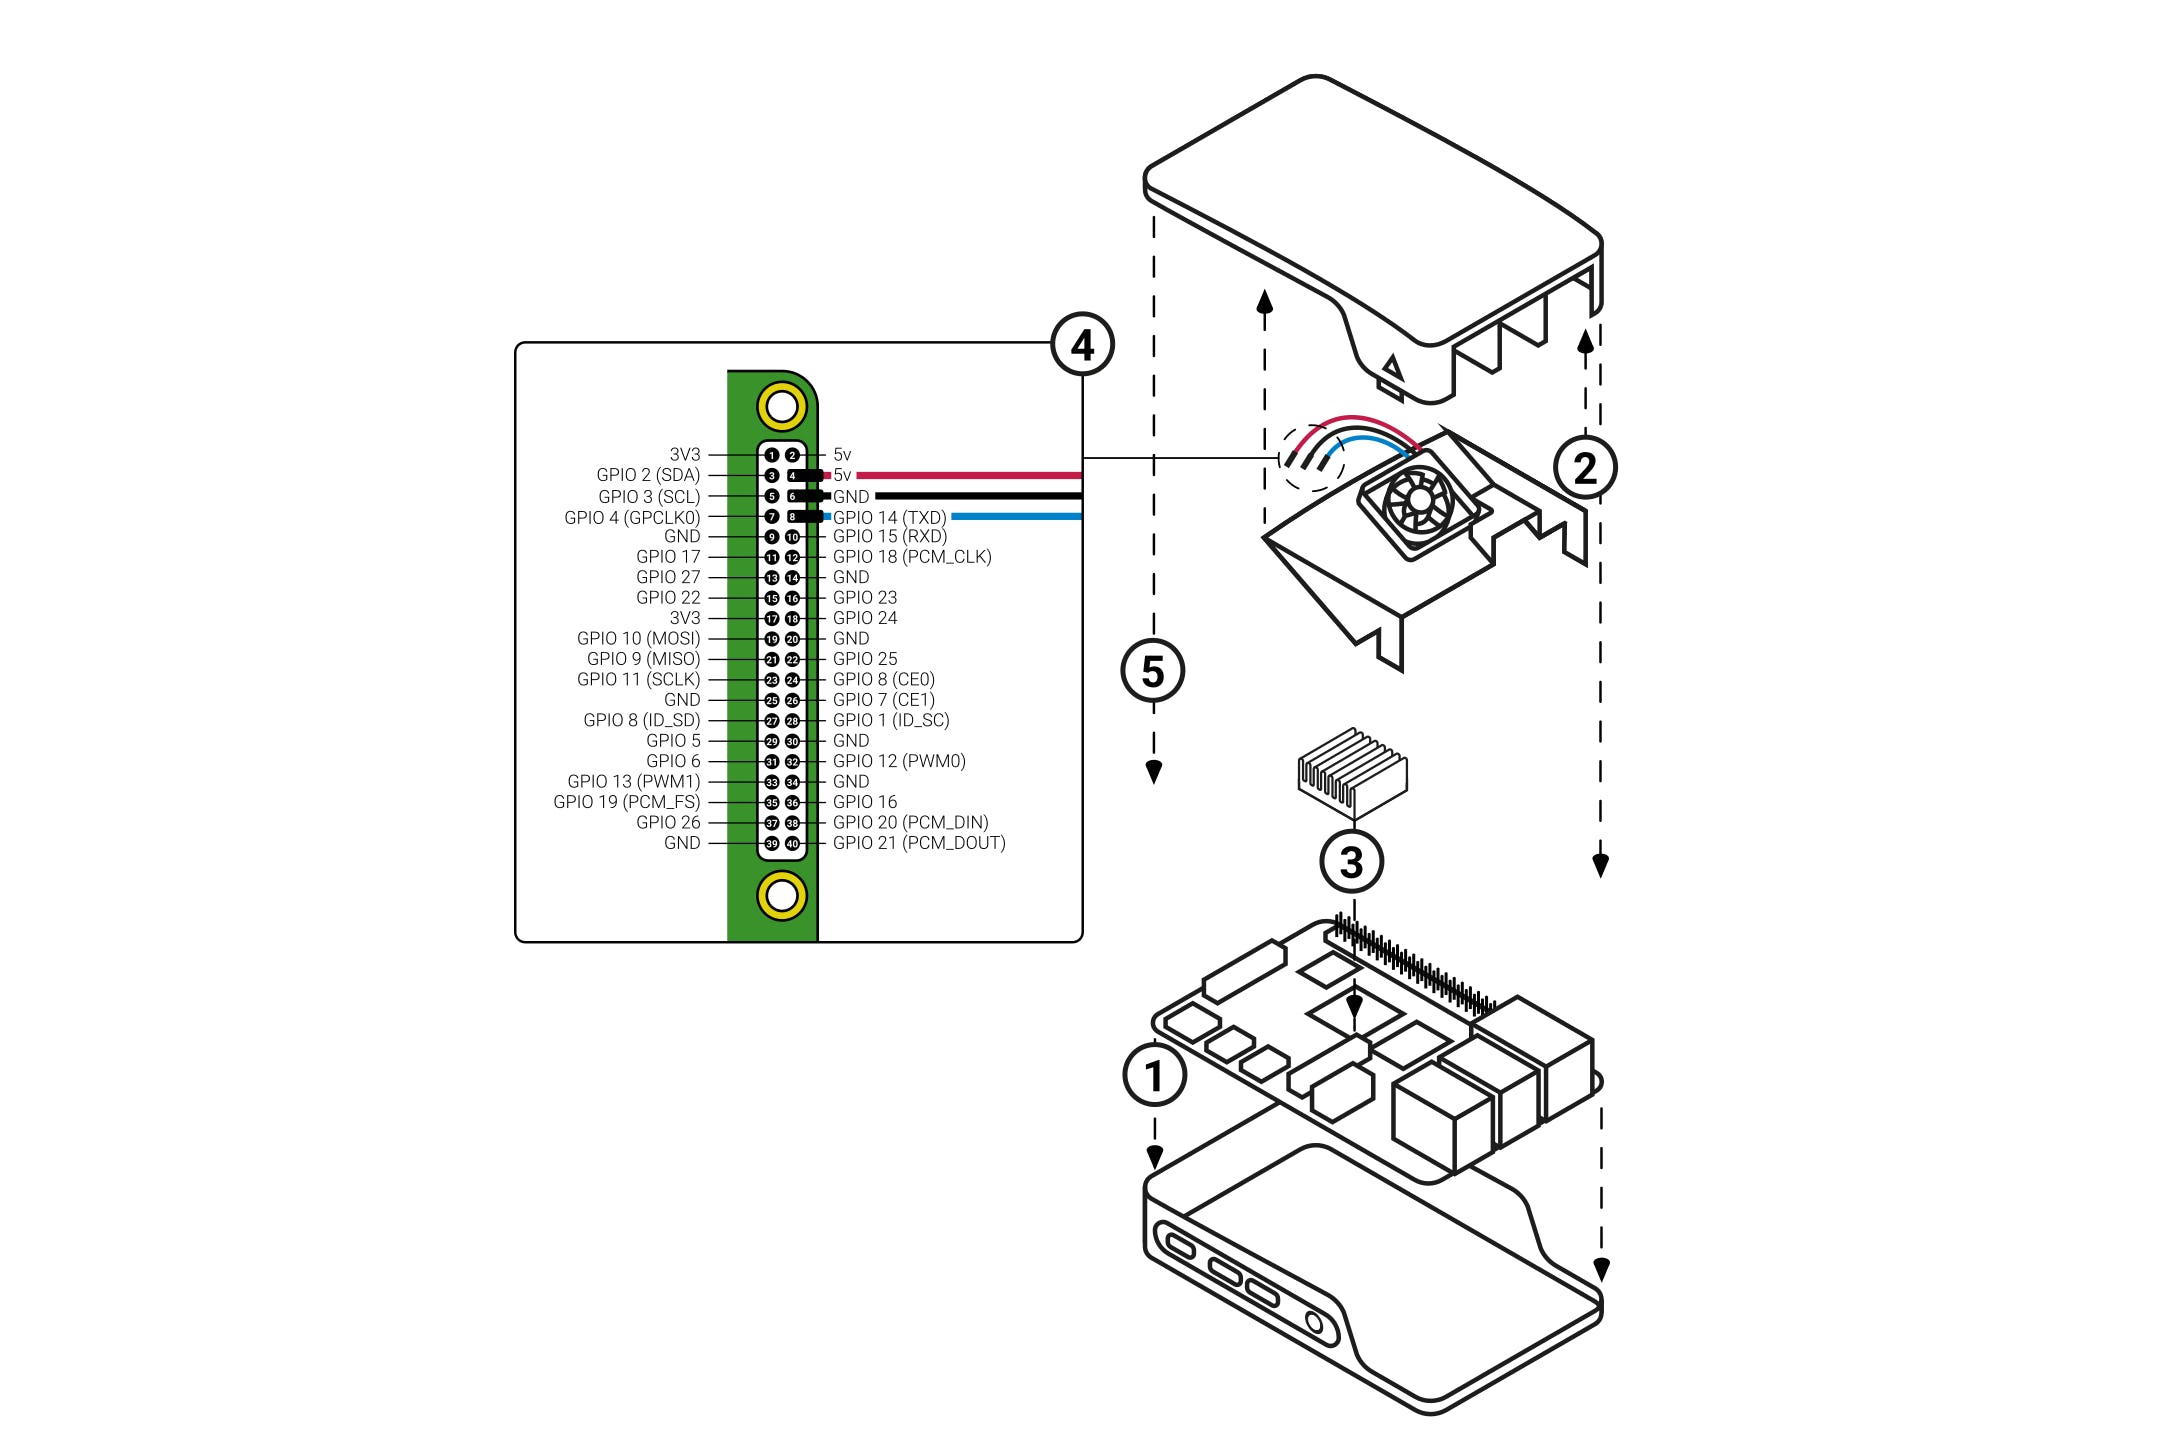
Assembling your fan with your case
- Remove any SD card, then put your Raspberry Pi into the lower half (base) of your case. Take care to align the mounting holes in the corners with the bumps in the case.
- Insert the fan into the upper half (lid) of the case, with the green label facing away from the lid. Push gently but firmly so that the two tabs on the fan housing click neatly into place inside the tabs on the lid. The slightly curved edge of the housing should be flush with the underside of the lid.
- If you are fitting the heatsink, remove the backing paper from the self-adhesive pad on the base of the heatsink, position it centrally over the processor, and gently press it into position.
- Connect the three leads from the fan to the Raspberry Pi’s GPIO pins, as shown in the diagram below. Take care to connect each lead to the correct pin.
- Fit the lid of the case onto the base.
Using your fan
Once you have connected your fan, by default it will be on whenever your Raspberry Pi is running. You can configure it to turn on only when your Raspberry Pi reaches a temperature that you choose.
Using a recent version of Raspberry Pi OS, first update to retrieve any recent changes to the operating system:
- Open the Terminal, either from the Start menu (click the Raspberry Pi icon in the top left corner) or by pressing Control + Alt + T.
- Type sudo apt update and then, when the update has finished, type sudo apt full-upgrade.
Then open the Raspberry Pi Configuration tool:
- Click on the Raspberry Pi icon in the top left corner and select Preferences then Raspberry Pi Configuration.
- Select the Performance tab.
- Next to Fan, click Enabled.
- If you have connected your fan as shown above, the default of 14 for Fan GPIO does not need to be changed.
- Select the Fan Temperature at which you want your fan to turn on. The default is 80°C, which will stop the Raspberry Pi throttling on difficult tasks without having the fan on all the time.
《Specification》
- Input voltage: 5V DC supplied via 40-pin GPIO header on Raspberry Pi 4
- Fan speed control: Pulse width modulation control via user-selectable GPIO pin
- Maximum airflow: 1.4 CFM
- Case material: Clear PC
《Documents》
* 注意:本商品不包含 Raspberry Pi
只有註冊並且購買過商品的顧客才能撰寫評價。
您可能也喜歡…
-
配件, RaspberryPi, 相機, 樹莓派 Raspberry Pi
Raspberry Pi High Quality Camera – C/CS mount | 樹莓派高畫質相機模組 | SONY IMX477 1230萬畫素
NT$1,900 – NT$4,750 未稅選擇規格Quick View -
配件, RaspberryPi, 相機, 樹莓派 Raspberry Pi
Raspberry Pi Camera Module V2 8MP 樹莓派相機模組 8百萬像素 | 攝像頭 | Sony IMX219
NT$714 未稅加入購物車Quick View -
配件, RaspberryPi, 外殼, 樹莓派 Raspberry Pi, 週邊
Raspberry Pi 4 Case | 樹莓派官方原廠紅白外殼
NT$200 – NT$400 未稅選擇規格Quick View


商品評價
目前沒有評價。